Karabiner: Use PC-style Home/End keys on Mac OS X

Karabiner allows to customize almost any aspect of the keymap on Mac OS X in a convenient way:

Karabiner – A powerful and stable keyboard customizer for OS X. (formerly known as KeyRemap4MacBook)

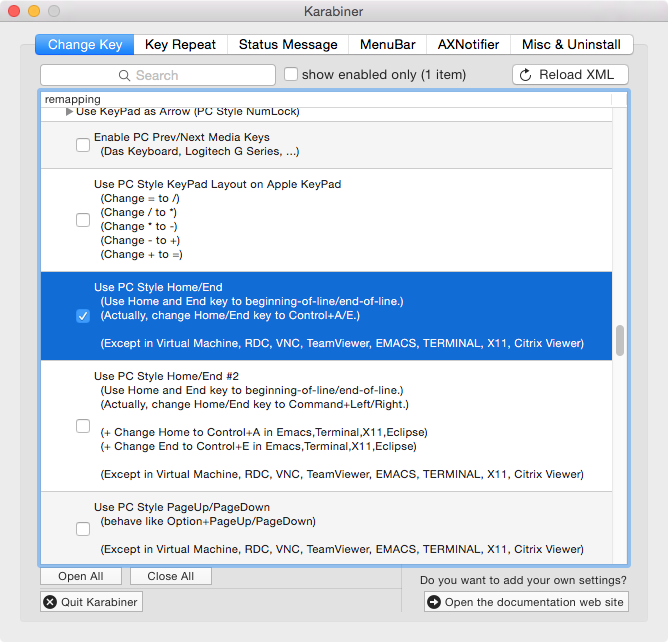
For example, you can make the “Home” and “End” keys behave like on a PC. Regarding these two keys, I find the PC style behaviour more intuitive, e.g. using shift-home and shift-end to select text, rather than using the tricky three-finger-combinations shift-cmd-left_cursor and shift-cmd-right_cursor in Mac OS X.

Here’s how to configure this in Karabiner:

karabiner_use_pc_style_home_and_end_keys


Further, I decided to lower the “Key Repeat Delay Until Repeat” to 100 ms and the “Key Repeat” to 23 ms for quicker navigation and repetitive typing.

Of course, there are many other useful tweaks to explore.

zpool: Symbol `spa_feature_table’ has different size in shared object, consider re-linking

If you see the following error message when executing ‘zpool status’ after “upgrading” Proxmox to the (currently) latest version with ZoL 0.6.4 instead of 0.6.3:

zpool: Symbol `spa_feature_table' has different size in shared object, consider re-linking

Explanation:

“Re-linking” doesn’t have a special meaning in ZFS/ZoL terminology, it rather just describes the usual linking step after compiling some source code.

Solution:

The most likely cause is that some new, updated and required packages have not been installed (e.g. with ‘uname -a’, you’ll see that the old kernel is still running, even after rebooting). Usually, this happens if one executes “apt-get update && apt-get upgrade” (as usual) rather than “apt-get update && apt-get dist-upgrade“. So, in order to solve this problem, do:

# apt-get update && apt-get dist-upgrade
# reboot

In this case, ZoL 0.6.4 also includes a couple of new features which can be enabled for all local ZFS pools by executing:

# zpool upgrade -a
This system supports ZFS pool feature flags.

Enabled the following features on 'rpool':
 spacemap_histogram
 enabled_txg
 hole_birth
 extensible_dataset
 embedded_data
 bookmarks

Mac OS X tools: FinderPath and HyperDock

On hacker news (i.e the better alternative interface http://hckrnews.com), I stumbled over two nice helper apps for Mac OS X:

FinderPath (free) shows the full path in the title bar of a Finder window upon double-clicking it. Like that, the full path can be selected and copied to the clipboard or one can simply edit the path and hereby easily navigate through the filesystem trees. It’s quite a time saver!

HyperDock (9.95 USD) displays thumbnail screenshots of all windows of the running apps in the Dock when hovering over them, making it easier and quicker to switch to other windows or to close them (the latter being a feature still missing in Mission Control). It also supports several other cool features, like Window Snapping.

Proxmox VE 3.4 and ZFS: How to create an ISO to use lz4 compression by default

EDIT 20150607: Meanwhile, this fix has been included by Proxmox – the current official Proxmox VE 3.4 Installer ISO finally enables lz4 compression by default at installation time. I thus recommend using an official Proxmox VE ISO image instead of creating an ISO image yourself, although creating your own ISO might still be interesting from an educational point of view or to include fixes that haven’t made it into the official Proxmox ISO yet.

Proxmox VE is a truly great, Debian based Linux distribution to host both KVM virtual machines and OpenVZ containers, using a RedHat based kernel (numlock.ch runs as a KVM guest on Proxmox VE, BTW ;).

With the recent release of Proxmox VE 3.4, the whole package got even better, now also allowing to install Proxmox on top of ZFS (which is the best enterprise file system available to date), specifically its native port for Linux, ZFS on Linux (ZoL).

Unfortunately, Proxmox VE 3.4 doesn’t allow to use lz4 as a compression algorithm at installation time yet: Using lz4 would be strongly recommended however instead of using ZoL’s default lzjb (or much worse: gzip). There are some known workarounds for this, but those are rather tedious, either involving extensive file copying or a manual setup of the ZFS pool and file systems.

The most elegant solution at the moment is creating a bootable ISO image (based on the original bootable Proxmox VE 3.4 ISO image) with a patched /usr/bin/proxinstall script that uses “compression=lz4” instead of “compression=on” by default.

And here’s how to create the patched ISO:

1. Loop-mount the original ISO (can only be mounted read-only):

# mount -o loop /path/to/proxmox-ve_3.4-3f2d890e-1.iso /mnt/cdrom

2. Copy /usr/bin/proxinstall from the mounted ISO image to a read-writeable directory (create directories as necessary):

# cp -a /mnt/cdrom/usr/bin/proxinstall /mnt/cdrom_patched/usr/bin/proxinstall

3. Edit the /mnt/cdrom_patched/usr/bin/proxinstall script as follows:

# diff -u ../cdrom/usr/bin/proxinstall usr/bin/proxinstall 
--- ../cdrom/usr/bin/proxinstall	2015-02-12 17:52:50.000000000 +0100
+++ usr/bin/proxinstall	2015-03-17 21:50:07.662031284 +0100
@@ -592,7 +592,7 @@
     # disable atime during insatll
     syscmd ("zfs set atime=off $zfspoolname") == 0 ||
 	die "unable to set zfs properties\n";
-    syscmd ("zfs set compression=on $zfspoolname") == 0 ||
+    syscmd ("zfs set compression=lz4 $zfspoolname") == 0 ||
 	die "unable to set zfs properties\n";
 }

4. Use the complicated but very powerful tool xorriso (install it, if necessary) to create a bootable ISO image based on the original ISO, but with /usr/bin/proxinstall “overwritten” with the edited proxinstall script:

# xorriso -boot_image grub patch -indev proxmox-ve_3.4-3f2d890e-1.iso -overwrite on -outdev proxmox-ve_3.4-3f2d890e-1-with-lz4-patch.iso -blank as_needed -pathspecs on -add /usr/bin/proxinstall=/mnt/cdrom_patched/usr/bin/proxinstall -- -commit

5. Use this patched ISO to install Proxmox VE 3.4 as usual

After rebooting the installed Proxmox VE 3.4 host/server, use the following command to verify that lz4 has been used by default:

# zfs get compression
NAME              PROPERTY     VALUE     SOURCE
rpool             compression  lz4       local
rpool/ROOT        compression  lz4       inherited from rpool
rpool/ROOT/pve-1  compression  lz4       inherited from rpool
rpool/swap        compression  lz4       inherited from rpool


For your convenience, here’s a patched ISO of Proxmox VE 3.4 for download (Note: Use it at your own risk!)

proxmox-ve_3.4-3f2d890e-1-with-lz4-patch.iso_.gz (571 MB, md5sum: 2abba5445133c011aadb1808237202b0)

Download it, gunzip it and rename it to proxmox-ve_3.4-3f2d890e-1-with-lz4-patch.iso to get rid of the silly underscore (“_”) WordPress appended when I uploaded the file. The resulting ISO image will be 725 MB, md5sum: e09e5d250d16fa182129c72be88a5aa2.

EDIT 20150607: Meanwhile, this fix has been included by Proxmox – the current official Proxmox VE 3.4 Installer ISO finally enables lz4 compression by default at installation time. I thus recommend using an official Proxmox VE ISO image instead of creating an ISO yourself.

Have fun!

Wi-Fi troubles with a B&W Zeppelin Air and AirPort Extreme/AirPort Time Capsule?

Recently, my B&W Zeppelin Air speakers have started to show a weird problem: I managed to stream music via AirPlay to them, but they would only play the music for a few seconds, then stop for a seemingly random amount of time, then play the music for a second or so again, then stop again, and so on. A lengthy stuttering, so to say.

Turns out, the reason for these troubles was that I set the AirPort Time Capsule’s main SSID wireless security to “WPA2 Personal” and the guest SSID’s wireless security to “WPA/WPA2 Personal”. Now I’ve set them both to “WPA/WPA2 Personal” and the Zeppelin Air works great again! Streaming also works fine if both “networks” are set to “WPA2 Personal” (which is a somewhat safer setting than WPA/WPA2 mixed mode, some old Wi-Fi cards might not work anymore, however).

I can’t quite explain this, based on the observed symptoms (one would expect things to either work or not work, but not half-way). It seems the AirPort Extreme/Time Capsule has troubles using different wireless security protocols for the main network and the guest network. This might also partly explain the generally shaky Wi-Fi connectivity I’ve experienced since upgrading my Macs to Yosemite – the random Wi-Fi connectivity drops even kept occurring in 10.10.2. I’ll keep an eye on it.


How to repair a Logitech Laser Mouse G9x/G9 with a shorted cable

Recently, my beloved Logitech Laser Mouse G9x showed signs of a broken, i.e. shorted cable. This is a well-known problem with these mice – I had a Laser Mouse G9 before and it suffered from the same problem, and the forums are full of similar reports. It’s also well-known however, that the G9/G9x is one of the best and most wanted fingertip grip mice apart from its cabling weakness (and if you use a mouse for 14+ hours daily or if you’re a pro gamer, you won’t ever want to use any other grip (video)).

Unfortunately, Logitech doesn’t produce the G9/G9x model anymore – though they probably could have easily fixed this weakness in the next revision and even improved some other aspects, like reducing the mouse’s weight. One thus has to find a dealer that still has some G9/G9x mice on stock (and accept a high “connoisseur’s” price, these mice usually sell for around 250 USD – mind fakes!) or go with a not quite equivalent, but similar Alienware TactX mouse (which is based on the G9/G9x and produced by Logitech). Alternatively, one can try soldering and fixing the shorted cable or order a spare cable from China, which are both better options than throwing away an otherwise still working mouse.

I decided to order a replacement cable including mouse feet at LittleWStore through Aliexpress for roughly 15 USD including shipping (it arrived within 2 weeks, earlier than the 4 to 5 weeks I expected to wait).

Unsurprisingly, there’s already a nice and informative YouTube video showing how to disassemble a Logitech Laser Mouse G9x, replace the cable and even how to repair a shorted cable (thanks to MrLiquidArrogance for the video – otherwise, I would have had to upload a video myself):

This allows me to only emphasize those points that deserve special attention:

  • Be aware that this repair requires advanced manual skill due to the somewhat unfortunate cabling inside the mouse and the not very maintenance-friendly attachment of the flex flat cable.
  • I’d strongly recommend ordering new replacement mouse feet as it’s almost impossible to remove the feet without tearing them, particularly if you’ve used the mouse for some years already. To remove the remaining glue, I used ethanol, but something hydrophobic (e.g. straight-run gasoline) might actually work better [Warning: Disconnect your mouse before doing this!].
  • I used my Victorinox CyberTool 34’s (video) phillips screwdrivers and it worked fine, but if you have thinner screwdrivers at hand, use those, as some of the smaller screws are a bit difficult to reach.
  • The most tricky thing to reassemble, in my view, is the mouse cable inside the mouse, which is laid out and bent in quite an odd (and scary) way. It’s also the reason why most of the G9x/G9 suffer from a shorted cable sooner or later. You have to bend and route the bundled wires in a way that they neither cover the hole for the screw in the bottom shell, nor the according plastic nut in the upper shell. This puts a lot of stress on the inner mouse cable and requires quite some manual force.
  • Other not so easy things:
    • Detaching the flex flat cable/ribbon (for the LEDs in the upper shell) without popping off the little latch (using a flathead screwdriver works though)
    • Putting the rubber grommet in place again (you need to apply quite some force and the grommet doesn’t really fit very well anyway)

For now, I’ve just quickly replaced the whole cable with a new one, but I will try fixing the old, damaged cable with my new Ersa i-CON1 digital solder station when I find time for it.

What I particularly like about the Logitech Laser Mouse G9x:

  • Its perfect geometry for finger tip grip users
  • Good quality of plastics, springs, buttons, wheel, laser sensor
  • Moderate weight (extra weights removed) as compared to the Mad Catz R.A.T. 7 (extra weights removed) – it’s still quite heavy though compared to other mice, this could be improved (if you intend to lift your mouse often, this is the wrong mouse)
  • Removable shells
  • “Hyper-fast scrolling” (this almost seems like a USP of Logitech – I like this feature a lot!)
  • Good, stable drivers
  • Has well-placed back and forward buttons with clearly defined clicking points
  • It’s a wired mouse, there’s thus no need to replace batteries, no risk of running out of battery in the worst possible moment, no added weight, no lag.

Alternatives might be:

Mad Catz R.A.T. 7:

– heavier

– no hyper-fast scrolling (I really miss that)

– less ergonomic forward and backward buttons

– terrible, totally unusable Mad Catz drivers (works well on Mac OS X though using the SteerMouse driver version 4.2.3 and newer – I tested a beta version of it – thanks, Yoshi!)

+ super customizable and adjustable geometry

+ handy precision-aim button (can also be programmed to show Mission Control or the desktop, for example)

+ handy horizontal thumb scroll wheel

Mad Catz R.A.T. 5:

If you can do with fewer or without customization options, the R.A.T. 5 or 3 will likely suit your needs as a fingertip grip user more as they’re lighter and smaller.

If you don’t care about (supposedly) durable, high-quality material, some of the other Mad Catz mice might be good alternatives too (e.g. the hard-plastic mice are generally lighter than those incorporating steel and/or aluminium)

Mad Catz R.A.T. Prox

This pro gamer mouse looks very exciting and promising for fingertip grip users – it looks like the perfect mouse to have, also for non-gamers with that grip. I really hope Mad Catz will dramatically improve their drivers though, as terribly bad drivers is currently their biggest weakness.

Microsoft IntelliMouse Explorer 3.0

Many people, particularly gamers, still like this mouse a lot, despite its age. It has a nice geometry and is light-weight (best for palm grips, but suitable for fingertip grip users with big hands too). I once had and used this mouse too (also its predecessor) and liked it a lot. The sensor is quite outdated (but liked by some gamers for its 400 dpi resolution) and used to prematurely die from one day to another. Nonetheless it was the last good mouse produced under the Microsoft brand.

Luckily, you can still find the Microsoft IntelliMouse Explorer 3.0 on Amazon.

[Edit 20150201: Fixed some typos, clarified some things, added a warning]

ASRock E3C226D2I Mini ITX motherboard and “Host is powered OFF or is in Sleep Mode.”

The ASRock E3C226D2I motherboard has great features for a nice Mini ITX SOHO server or NAS (more details to follow in a later post), but it also has its quirks when it comes to the two RAM slots.

So, if you encounter the following error message when accessing the remote console (using the Java applet):

Host is powered OFF or is in Sleep Mode.

Or if you see no output (a blank screen) at boot-time on a display connected to the VGA port, check that the RAM DIMMs are sitting correctly in the RAM slots. This is a bit tricky as first, there’s usually not a lot of maneuvering space in a Mini ITX case,  so applying pressure is difficult, second this motherboard’s RAM slots are particularly tricky to handle.

My advice is to unplug the device, unlock a RAM slot, then try inserting the DIMM (in correct orientation, check the notch!) smoothly with low and equal pressure on both sides. Once it’s more or less equally placed in the slot, apply firm pressure on the top of the DIMM at the side opposite of the slot’s open lock until you hear a click sound of the DIMM snapping in. Then apply firm pressure on the other side of the DIMM till that part snaps in with an audible click too (the lock will close).

Sounds pretty standard? It actually is, with the exception that this board’s RAM slots require a lot more pressure for the DIMMs to snap in than with most other motherboards out there.