Using multiple Skype accounts on macOS

With the recent changes in Skype, the “traditional” method of running several Skype instances using different system users doesn’t work anymore (as the the new authentication dialog strangely doesn’t get the focus anymore).

So, in order to use several Skype accounts on macOS (formerly known as Mac OS X), do the following:

  1. Open the Script Editor (in the ‘Utilities’ folder in the ‘Applications’ folder)
  2. Create a new script with the following content:
    do shell script "open -na /Applications/Skype.app/Contents/MacOS/Skype --args -DataPath '/Users/your_system_user/Library/Application Support/Skype_any_identifier'"

    Replace your_system_user by your regular macOS user account (see ‘whoami’ in Terminal)
    Replace _any_identifier by the according Skype account name, e.g. _myskypename (doesn’t really matter what, just don’t use an empty string)
    Please mind the double quotes and single quotes (important!)

  3. Save the script as an application: File.. Save.., choose “Application” as file format, give it a name and store it e.g. in your home directory or in the Applications folder

Repeat these steps for any of your Skype accounts, giving each Skype account a different Skype_any_identifier. You can then start the according Skype instances by double clicking on the according app.

Explanation:

The above script starts a new instance of Skype (which would otherwise be prevented), using the -n argument. Each instance of Skype gets its own directory to store the according account data, using the -DataPath argument.

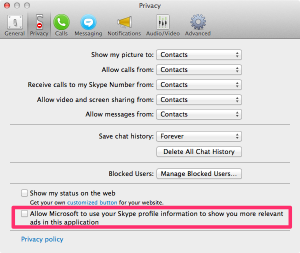
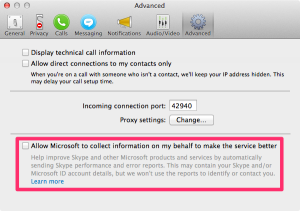
Microsoft and Skype’s privacy settings

I don’t know exactly when these settings were introduced in Skype, but it’s obvious that they haven’t been there in this form before Microsoft’s acquisition of Skype.

The irritating thing is that one of my Skype accounts had the “Allow Microsoft to use your Skype profile information to show you more relevant ads in this application” setting enabled and I can’t remember (nor imagine) I ever knowingly allowed ad targeting.

skype_privacy

The other one is “Allow Microsoft to collect information on my behalf to make the service better” which they decided to hide in the “advanced” settings tab, although it’s clearly very privacy relevant (just read the disclaimer).

skype_advanced

So, make sure to revise all your settings in Skype, particularly those in the privacy and advanced tabs.

Skype 5.3.0.116 – a memory hog with memory leaks

Just take a look at the following screenshot I just took, showing two Skype 5.3.0.116 instances running on a current Windows 7 box with 4 GB of RAM:

That’s 330 MB of private memory for each instance at this very moment! Note that these numbers are steadily growing (at about 2 KB/s) for both processes – for no apparent reason. A hint, that there’s likely a memory leak somewhere in Skype.

Let’s hope Microsoft will rewrite Skype from scratch (The current code-base probably isn’t worth refactoring). I’m confident they don’t lack the human and financial resources to do it. It can only get better.

Simultaneously using multiple accounts with Skype 4.0

As an addendum to my earlier post, I’ve just noticed that a) Skype 4.0 Beta 2 runs pretty stable on Windows Vista 64 and b) has built-in support for managing multiple Skype accounts! With the help of this feature, you could for example set up a private account and a business account and use both of them at the same time, using the same Windows user account. The setup is straightforward:

1) Install Skype 4.0 Beta 2

2) Create a shortcut to Skype.exe and place it on the quick launch bar. Rename the shortcut to “Skype Private Account”, for example. Start Skype using this shortcut and setup your first account (in this case, your private account).

3) Create another shortcut to Skype.exe (add it to the quick launch bar, too) and name it “Skype Business Account”. Open the “Properties” dialog of this shortcut by right-clicking on it. In the “Target” text field of the properties dialog box, append ” /secondary” (without double quotes) to the Skype.exe path that is already there. For example, in my case, the “Target” text field contains:

“C:\Program Files (x86)\Skype\Phone\Skype.exe” /secondary

Rename this shortcut to “Skype Business Account” (right-click->rename). Having done this, start Skype using this shortcut. Skype will then prompt you to enter the credentials of another Skype account of yours (in this example, of your business account).

You can also choose different icons for the two shortcuts. Further, I’d assume the /secondary feature isn’t limited to managing two Skype accounts, though I haven’t tested it with more than two accounts. The main advantage of this “/secondary” feature is that you don’t need to have a separate Windows user account for each of your Skype accounts. Note however that, even with this solution, a new instance of Skype will be created for each of your Skype accounts – every instance consuming about 40 MB of RAM.

I think that’s a very useful feature and I like it a lot.

Multiple Skype accounts on one computer

It’s a bit of a hack as with this solution, Skype’s memory usage will grow linearly with every additional instance of the Skype client you run (about 40 MB are required per instance), but at least it seems to work fine on Windows XP:

http://www.tradebit.com/channels/software/110543/multiple-skype-accounts-on-one-computer/

Note that the double quotes should be simple double quotes, not typographical ones. So for 2.) the link’s destination should be sth like

%windir%\system32\RUNAS.exe /profile "/user:skype2" /savecred "C:\Program Files\Skype\Phone\Skype.exe"

(Of course you need to adjust the paths and user to your environment and settings)

Alternatively, particularly if you use Windows Vista, you could try this free Skype launcher (I haven’t tested it):

http://forum.skype.com/index.php?showtopic=88055

Since this launcher doesn’t seem to use dedicated Windows user accounts on your box, you’ll have to disable Skype’s auto-login feature in order to use different Skype profiles.