The ‘All-in-One WP Migration’ plugin is all you need to migrate your WordPress blog

This blog has just been migrated to a newer and (much) faster host node running Proxmox 5 with ZFS.

Therefore, I was looking for the best method to migrate a WordPress blog to another server (and/or database and/or directory and/or URL).

Do you remember the times when migrating a WordPress blog was rather tedious, involving many manual steps, despite (other) handy tools like WP-CLI? Apparently, this is no longer needed, as all you need is the following plugin:

All-in-One WP Migration

This plugin’s export and import functionality takes care of all the required configuration and path adjustments, allowing you to easily migrate a blog with up to 512 MB data. The steps are thus:

  1. Install the All-in-One WP Migration plugin on your current WordPress site
  2. Use the plugin to export all your data, plugins, themes, configuration etc., e.g. as a downloadable file.
    Note: In particularly tricky cases you can also manually replace certain strings in the db or exclude specific data and files.
  3. Setup a new vanilla WordPress installation at another location (server, directory). You’ll need a database and the WP installation files for this.
  4. Install the All-in-One WP Migration plugin on your new WordPress site
  5. Use the plugin on your new site to import the previously exported data from your old site

It’s hard to believe, but that’s really it!

How to upgrade Zimbra/ZCS 8.8 GA from Ubuntu 14.04 LTS to 16.04 LTS

When upgrading Ubuntu 14.04 LTS to 16.04 LTS the usual way, ‘do-release-upgrade’ will by default remove 3rd party packages. For a Zimbra/ZCS server this means that Zimbra/ZCS packages would be automatically removed when upgrading to Ubuntu 16.04 LTS.

Luckily, there’s a neat little trick to prevent ‘do-release-upgrade’ from removing Zimbra/ZCS packages during the upgrade. Here’s how to do it:

  1. Open two screen sessions (or two terminal sessions) on your Zimbra/ZCS server
     $ screen -R
  2. Block at least the SMTP and SMTPS ports (to prevent clients from accessing the server, consider blocking the IMAP and IMAPS ports too, or all ports but SSH and port 1022) for your Zimbra/ZCS server on your firewall (to stop the delivery of messages).
  3. Backup the server or make a snapshot, just in case anything goes wrong
  4. Stop Zimbra/ZCS:
     $ sudo /etc/init.d/zimbra stop
  5. Make sure the system is current:
     $ sudo apt-get update && sudo apt-get upgrade
  6. Start the Ubuntu distro upgrade process:
     $ sudo do-release-upgrade

    (if you don’t have do-release-upgrade, you have to execute ‘sudo apt-get install update-manager-core’ first)

  7. When prompted by ‘do-release-upgrade’ that the third party sources have been disabled, re-enable those third party sources. To do this, open ‘/etc/apt/sources.list.d/zimbra.list’ with an editor (e.g. nano, vim) in another terminal/screen session and change its content from:
    # deb [arch=amd64] https://repo.zimbra.com/apt/87 xenial zimbra # disabled on upgrade to xenial
    # deb-src [arch=amd64] https://repo.zimbra.com/apt/87 xenial zimbra # disabled on upgrade to xenial

    to

    deb [arch=amd64] https://repo.zimbra.com/apt/87 xenial zimbra
    deb-src [arch=amd64] https://repo.zimbra.com/apt/87 xenial zimbra

    Then return to the first terminal/screen session and let ‘do-release-upgrade’ continue with the upgrade process (i.e. hit ‘enter’).

  8. When you get informed about the packages that will be removed (BTW, in the detail view you can see that the Zimbra packages will now be upgraded, not removed) and upgraded and asked whether you want to start the upgrade, confirm this.
    Note: Don’t worry about minor error messages like:E: changelog for this version is not (yet) available; try https://launchpad.net/ubuntu/+source/zimbra-perl-socket/+changelogYou can safely ignore them.
  9. Agree to all suggestions by ‘do-release-upgrade’ (e.g. the removal of files in /var/log/sysstat/ and whether you allow ssh to be restarted). In my case, it was also fine to go with the maintainer versions of the config files.
  10. When the upgrade process is finished, let ‘do-release-upgrade’ reboot the system.

After this, Zimbra/ZCS should work nicely again, on Ubuntu 16.04 LTS.

Note: It can take Zimbra/ZCS quite some time to properly start all its services (it’s Java, after all). Sometimes, the output of ‘$ sudo /etc/init.d/zimbra status’ and what’s listed in the service monitoring section of the Zimbra/ZCS admin webUI can thus be inconsistent. Sometimes, it’s even necessary to stop and start Zimbra/ZCS a couple of times (with ‘/etc/init.d/zimbra’) after an upgrade until all services run nicely.
Also note that Zimbra’s new dedicated ‘imapd’ service won’t run properly, unless it’s configured manually, as shown in the Zimbra Collaboration Administrator Guide version 8.8.3. If it doesn’t run properly, this service will simply be ignored in a single server setup, your Zimbra/ZCS will thus likely work as usual.

If there are any problems or if you want to be extra cautious, you can also additionally download Zimbra/ZCS 8.8 for 16.04 LTS manually and run its installer again:

$ sudo ./install.sh

If everything is fine, unblock the SMTP and SMTPS (and IMAP and IMAPS) ports again.

If things aren’t fine, simply roll-back from the snapshot or restore the whole server from the backup.

You might then want to try a fresh install according to the official Zimbra/ZCS migration manual: How to move ZCS to another server.

(Source: Kudos to vchong68 for his valuable hint in his forum post)

Solution for: Proxmox backup error due to iothread=1

If you see the following error when trying to backup a KVM VM image on Proxmox:

ERROR: Backup of VM 100 failed – disk ‘scsi0’ ‘zfsvols:vm-100-disk-1’ (iothread=on) can’t use backup feature currently. Please set backup=no for this drive at /usr/share/perl5/PVE/VZDump/QemuServer.pm line 77. INFO: Backup job finished with errors TASK ERROR: job errors

edit /etc/pve/qemu-server/100.conf, look for a line similar to

scsi0: zfsvols:vm-100-disk-1,iothread=1,size=70G

and change it to

scsi0: zfsvols:vm-100-disk-1,iothread=0,size=70G

Afterwards, it’s possible to backup the VM.

How to check filesystems in a qcow2 image

A useful post how to fsck (check and fix) a filesystem in a qcow2 image (as typically used for KVM VMs, e.g. in Proxmox):

How to recover a qcow2 file using fsck

On Proxmox or Debian, one does the following:

Attention:

  • Make sure the according VM isn’t running, i.e. the partition not mounted
  • Adjust the commands below to match your system, use the correct qcow2 image, use the correct fsck-variant, fsck the correct filesystem, note that -p tries to automatically fix errors!
# modprobe nbd max_part=8
# qemu-nbd --connect=/dev/nbd0 /var/lib/vz/images/100/vm-100-disk-1.qcow2
# fdisk -l /dev/ndb0
/dev/nbd0p1            2048     7813119     3905536   82  Linux swap / Solaris
/dev/nbd0p2   *     7813120   119537663    55862272   83  Linux
# fsck.ext4 /dev/nbd0p2
# fsck.ext4 -p /dev/nbd0p2
# qemu-nbd --disconnect /dev/nbd0

Like this, one doesn’t need to boot the VM using a boot ISO/CDROM and can fix the filesystem right from the host node.


#32c3 presentations to watch (note to self)

Overview of recorded presentations:

https://media.ccc.de/b/congress/2015

My list of particularly interesting presentations (mostly for myself – disclaimer: I haven’t watched all of these presentations yet as I didn’t make it to Hamburg this year):

zpool: Symbol `spa_feature_table’ has different size in shared object, consider re-linking

If you see the following error message when executing ‘zpool status’ after “upgrading” Proxmox to the (currently) latest version with ZoL 0.6.4 instead of 0.6.3:

zpool: Symbol `spa_feature_table' has different size in shared object, consider re-linking

Explanation:

“Re-linking” doesn’t have a special meaning in ZFS/ZoL terminology, it rather just describes the usual linking step after compiling some source code.

Solution:

The most likely cause is that some new, updated and required packages have not been installed (e.g. with ‘uname -a’, you’ll see that the old kernel is still running, even after rebooting). Usually, this happens if one executes “apt-get update && apt-get upgrade” (as usual) rather than “apt-get update && apt-get dist-upgrade“. So, in order to solve this problem, do:

# apt-get update && apt-get dist-upgrade
# reboot

In this case, ZoL 0.6.4 also includes a couple of new features which can be enabled for all local ZFS pools by executing:

# zpool upgrade -a
This system supports ZFS pool feature flags.

Enabled the following features on 'rpool':
 spacemap_histogram
 enabled_txg
 hole_birth
 extensible_dataset
 embedded_data
 bookmarks

Proxmox VE 3.4 and ZFS: How to create an ISO to use lz4 compression by default

EDIT 20150607: Meanwhile, this fix has been included by Proxmox – the current official Proxmox VE 3.4 Installer ISO finally enables lz4 compression by default at installation time. I thus recommend using an official Proxmox VE ISO image instead of creating an ISO image yourself, although creating your own ISO might still be interesting from an educational point of view or to include fixes that haven’t made it into the official Proxmox ISO yet.

Proxmox VE is a truly great, Debian based Linux distribution to host both KVM virtual machines and OpenVZ containers, using a RedHat based kernel (numlock.ch runs as a KVM guest on Proxmox VE, BTW ;).

With the recent release of Proxmox VE 3.4, the whole package got even better, now also allowing to install Proxmox on top of ZFS (which is the best enterprise file system available to date), specifically its native port for Linux, ZFS on Linux (ZoL).

Unfortunately, Proxmox VE 3.4 doesn’t allow to use lz4 as a compression algorithm at installation time yet: Using lz4 would be strongly recommended however instead of using ZoL’s default lzjb (or much worse: gzip). There are some known workarounds for this, but those are rather tedious, either involving extensive file copying or a manual setup of the ZFS pool and file systems.

The most elegant solution at the moment is creating a bootable ISO image (based on the original bootable Proxmox VE 3.4 ISO image) with a patched /usr/bin/proxinstall script that uses “compression=lz4” instead of “compression=on” by default.

And here’s how to create the patched ISO:

1. Loop-mount the original ISO (can only be mounted read-only):

# mount -o loop /path/to/proxmox-ve_3.4-3f2d890e-1.iso /mnt/cdrom

2. Copy /usr/bin/proxinstall from the mounted ISO image to a read-writeable directory (create directories as necessary):

# cp -a /mnt/cdrom/usr/bin/proxinstall /mnt/cdrom_patched/usr/bin/proxinstall

3. Edit the /mnt/cdrom_patched/usr/bin/proxinstall script as follows:

# diff -u ../cdrom/usr/bin/proxinstall usr/bin/proxinstall 
--- ../cdrom/usr/bin/proxinstall	2015-02-12 17:52:50.000000000 +0100
+++ usr/bin/proxinstall	2015-03-17 21:50:07.662031284 +0100
@@ -592,7 +592,7 @@
     # disable atime during insatll
     syscmd ("zfs set atime=off $zfspoolname") == 0 ||
 	die "unable to set zfs properties\n";
-    syscmd ("zfs set compression=on $zfspoolname") == 0 ||
+    syscmd ("zfs set compression=lz4 $zfspoolname") == 0 ||
 	die "unable to set zfs properties\n";
 }

4. Use the complicated but very powerful tool xorriso (install it, if necessary) to create a bootable ISO image based on the original ISO, but with /usr/bin/proxinstall “overwritten” with the edited proxinstall script:

# xorriso -boot_image grub patch -indev proxmox-ve_3.4-3f2d890e-1.iso -overwrite on -outdev proxmox-ve_3.4-3f2d890e-1-with-lz4-patch.iso -blank as_needed -pathspecs on -add /usr/bin/proxinstall=/mnt/cdrom_patched/usr/bin/proxinstall -- -commit

5. Use this patched ISO to install Proxmox VE 3.4 as usual

After rebooting the installed Proxmox VE 3.4 host/server, use the following command to verify that lz4 has been used by default:

# zfs get compression
NAME              PROPERTY     VALUE     SOURCE
rpool             compression  lz4       local
rpool/ROOT        compression  lz4       inherited from rpool
rpool/ROOT/pve-1  compression  lz4       inherited from rpool
rpool/swap        compression  lz4       inherited from rpool


For your convenience, here’s a patched ISO of Proxmox VE 3.4 for download (Note: Use it at your own risk!)

proxmox-ve_3.4-3f2d890e-1-with-lz4-patch.iso_.gz (571 MB, md5sum: 2abba5445133c011aadb1808237202b0)

Download it, gunzip it and rename it to proxmox-ve_3.4-3f2d890e-1-with-lz4-patch.iso to get rid of the silly underscore (“_”) WordPress appended when I uploaded the file. The resulting ISO image will be 725 MB, md5sum: e09e5d250d16fa182129c72be88a5aa2.

EDIT 20150607: Meanwhile, this fix has been included by Proxmox – the current official Proxmox VE 3.4 Installer ISO finally enables lz4 compression by default at installation time. I thus recommend using an official Proxmox VE ISO image instead of creating an ISO yourself.

Have fun!

Microsoft and Skype’s privacy settings

I don’t know exactly when these settings were introduced in Skype, but it’s obvious that they haven’t been there in this form before Microsoft’s acquisition of Skype.

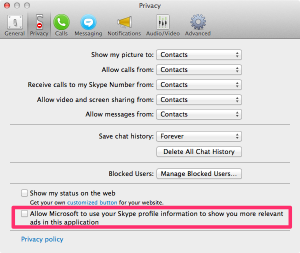
The irritating thing is that one of my Skype accounts had the “Allow Microsoft to use your Skype profile information to show you more relevant ads in this application” setting enabled and I can’t remember (nor imagine) I ever knowingly allowed ad targeting.

skype_privacy

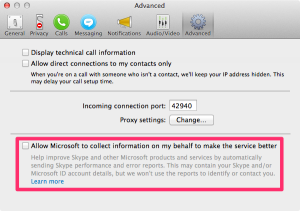
The other one is “Allow Microsoft to collect information on my behalf to make the service better” which they decided to hide in the “advanced” settings tab, although it’s clearly very privacy relevant (just read the disclaimer).

skype_advanced

So, make sure to revise all your settings in Skype, particularly those in the privacy and advanced tabs.

Homebrew package for t-prot: TOFU protection for e-mail

In a current LUGS mailing list thread, mowgli pointed to the t-prot script as a nice tool to “fix” the so-called (and very common) TOFU style message quoting and some other annoyances (like commercial webmail provider signatures, overly excited !!!! statements, etc.) in e-mail messages. t-prot was originally developed for mutt, but can also be used with other mail clients.

As there wasn’t any t-prot package for my favourite Mac OS X package manager Homebrew yet (apparently only for MacPorts), I quickly created one myself [Edited on Feb 24, 2015: Updated for t-prot version 3.3]:

  1. Create the file /usr/local/Library/Formula/t-prot.rb and add the following (fantastically trivial) content:
    require "formula"
    
    class TProt < Formula
      homepage "http://www.escape.de/~tolot/mutt/"
      url "http://www.escape.de/~tolot/mutt/t-prot/downloads/t-prot-3.3.tar.gz"
      sha1 "9be24629abc598b24e887f47e9a62feddc3ed4ad"
    
      def install
        bin.install 't-prot'
        man1.install 't-prot.1'
      end
    
    end
    
  2. Install t-prot (run the following Homebrew command in a terminal window):
    brew install t-prot
  3. Add the following line to your .muttrc (or check ‘man t-prot’ or the t-prot web page for options and examples):
    set display_filter="t-prot -cemt -M=mutt"